


Authentication and user management are critical to any application, yet often the hardest to test. For example, how do you validate a moderation feature without risking real user data? Or ensure that role-based access control changes work correctly across your entire user base?
Traditionally, teams rely on staging environments, but keeping them in sync with production is complex, and synthetic data rarely reflects real behavior. A better approach is to give each feature branch access to realistic production data. The challenge is that cloning entire databases for every branch is slow, costly, and difficult to keep authentication data aligned.
Neon solves this with Database Branching. Using Copy‑on‑Write, Neon creates instant, isolated branches that are lightweight and cost‑effective making it practical to spin up a new database for every pull request. This extends naturally to Neon Auth: because identity data lives in the database, it is cloned automatically with each branch, giving you a safe, production‑like environment to test destructive authentication flows without risk.
This guide demonstrates that workflow using Neon Branching and Vercel. With the Neon‑Managed Vercel Integration, every pull request triggers a Vercel Preview Deployment, and Neon provisions a matching database branch containing a snapshot of your production users.
You will build a simple Message Board to demonstrate this workflow:
- Start with an open board where anyone can post (Production).
- Develop a "Moderation" feature where only Admins can approve posts (Preview Deployment).
- Test the Admin flow using real user accounts in the isolated Preview environment.
- Verify that production remains unaffected throughout the process.
Prerequisites
Before you begin, ensure you have the following:
- Node.js
v20.0or later. - A Vercel account and a GitHub account.
Deploy the Base Application
You will start with a basic message board application where any authenticated user can post messages and see messages from others. To focus on the branching workflow this guide uses a pre-built starter repository.
note
If you need a refresher on setting up a new Next.js application with Neon Auth from scratch, check out Getting started with Neon Auth and Next.js.
Fork the repository
Navigate to the starter repository and fork it into your own GitHub account.
This project is built with Next.js (App Router), Neon Auth for authentication, and Drizzle ORM for database interactions.
Deploy to Production
Now deploy the forked repository to Vercel.
- Open your Vercel Dashboard and click Add New -> Project.
- Select the forked repository from your GitHub account.
- Deploy the project using the default settings.
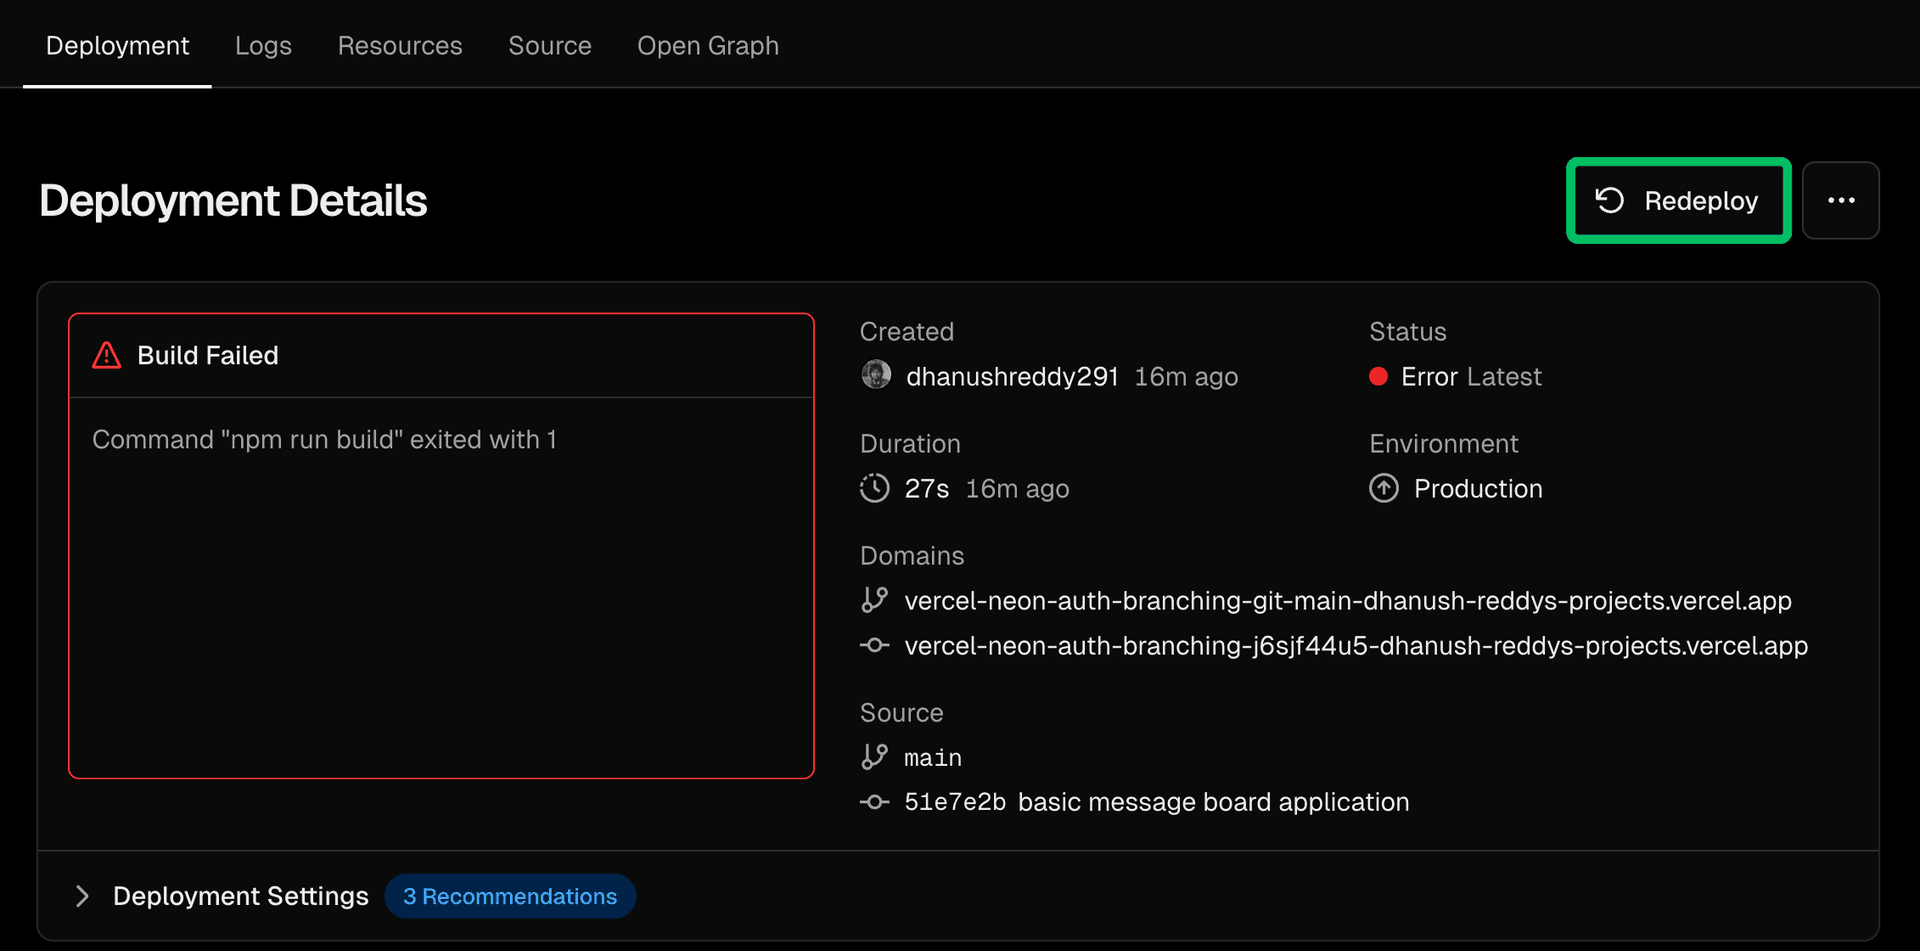
Initial Deployment Failure
The initial deployment will fail - this is expected. Vercel does not yet have the required environment variables to connect to Neon. You will configure these in the next step using the Neon-Vercel integration.
Connect Vercel to Neon
You will need to create a Neon project and connect it to Vercel using the Neon Vercel integration.
-
Open the Neon integration on the Vercel Marketplace and click Install.
-
In the Install Neon modal, choose one of the following options depending on whether you already have a Neon account:
- Create New Neon Account
- Link Existing Neon Account
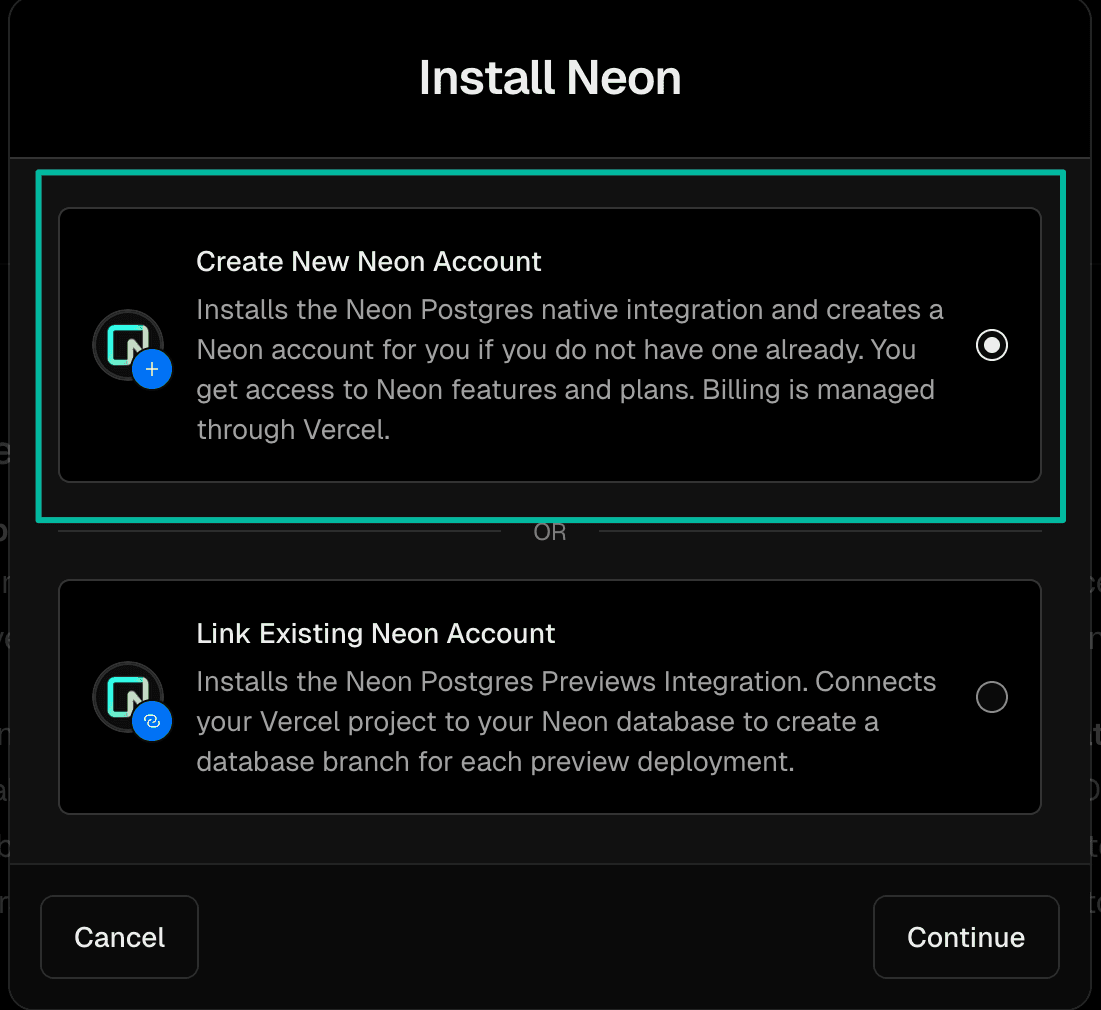
-
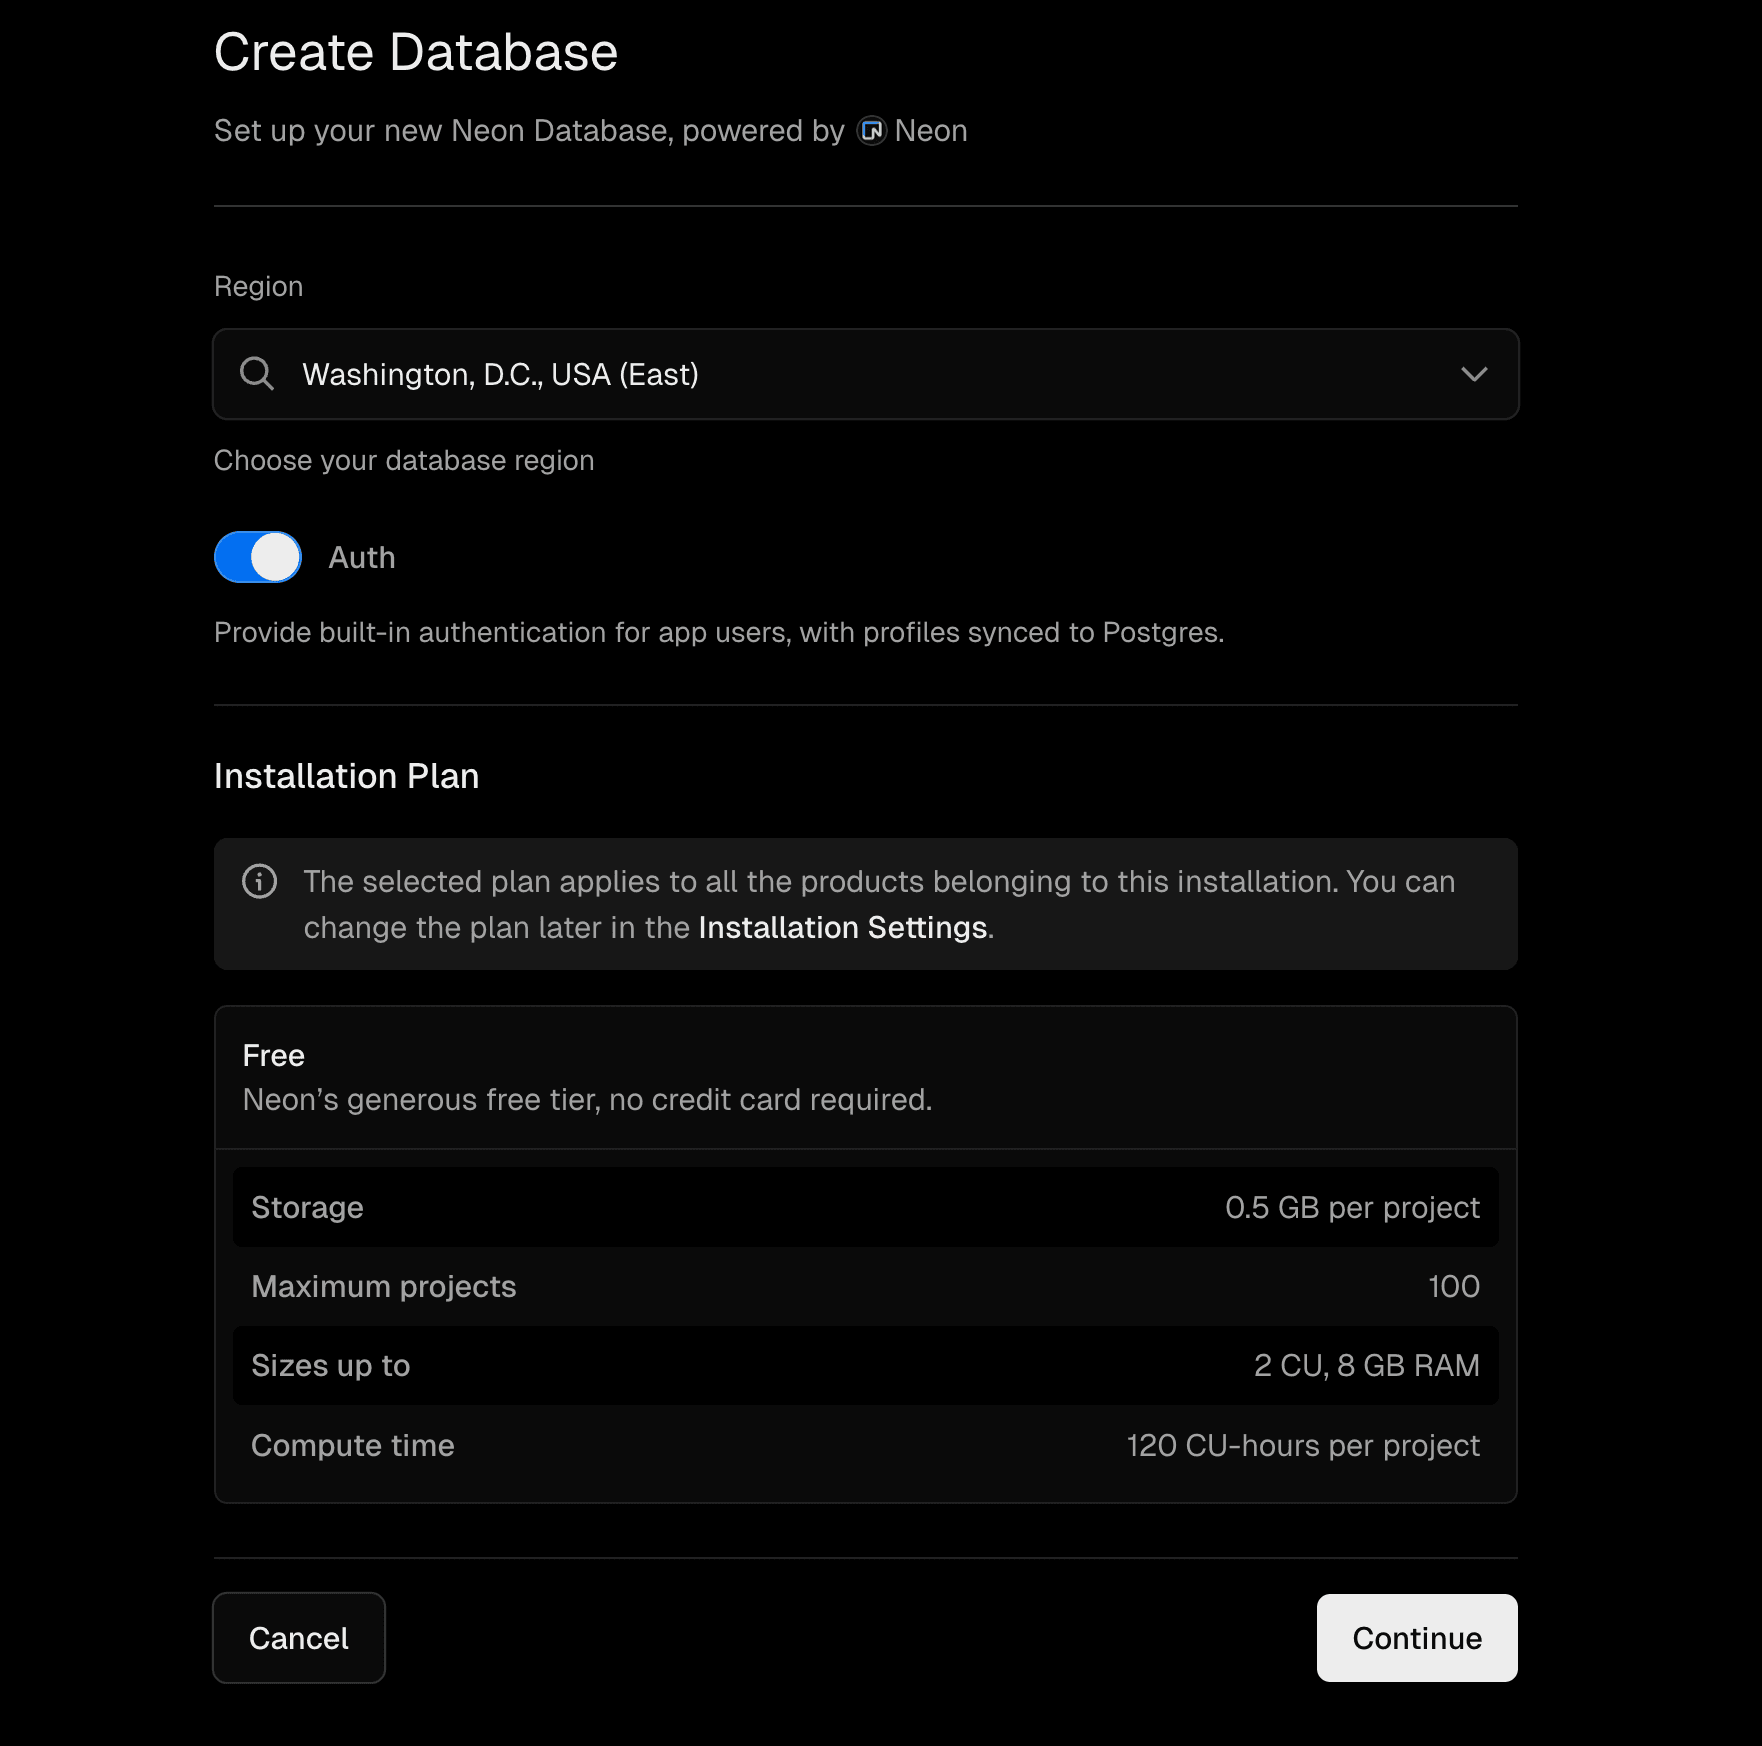
Accept the terms, then select a region and plan for your Neon project.
-
Make sure Auth is checked, then click Continue.
-
Enter a project name (for example,
vercel-neon-auth-branching) and click Create. -
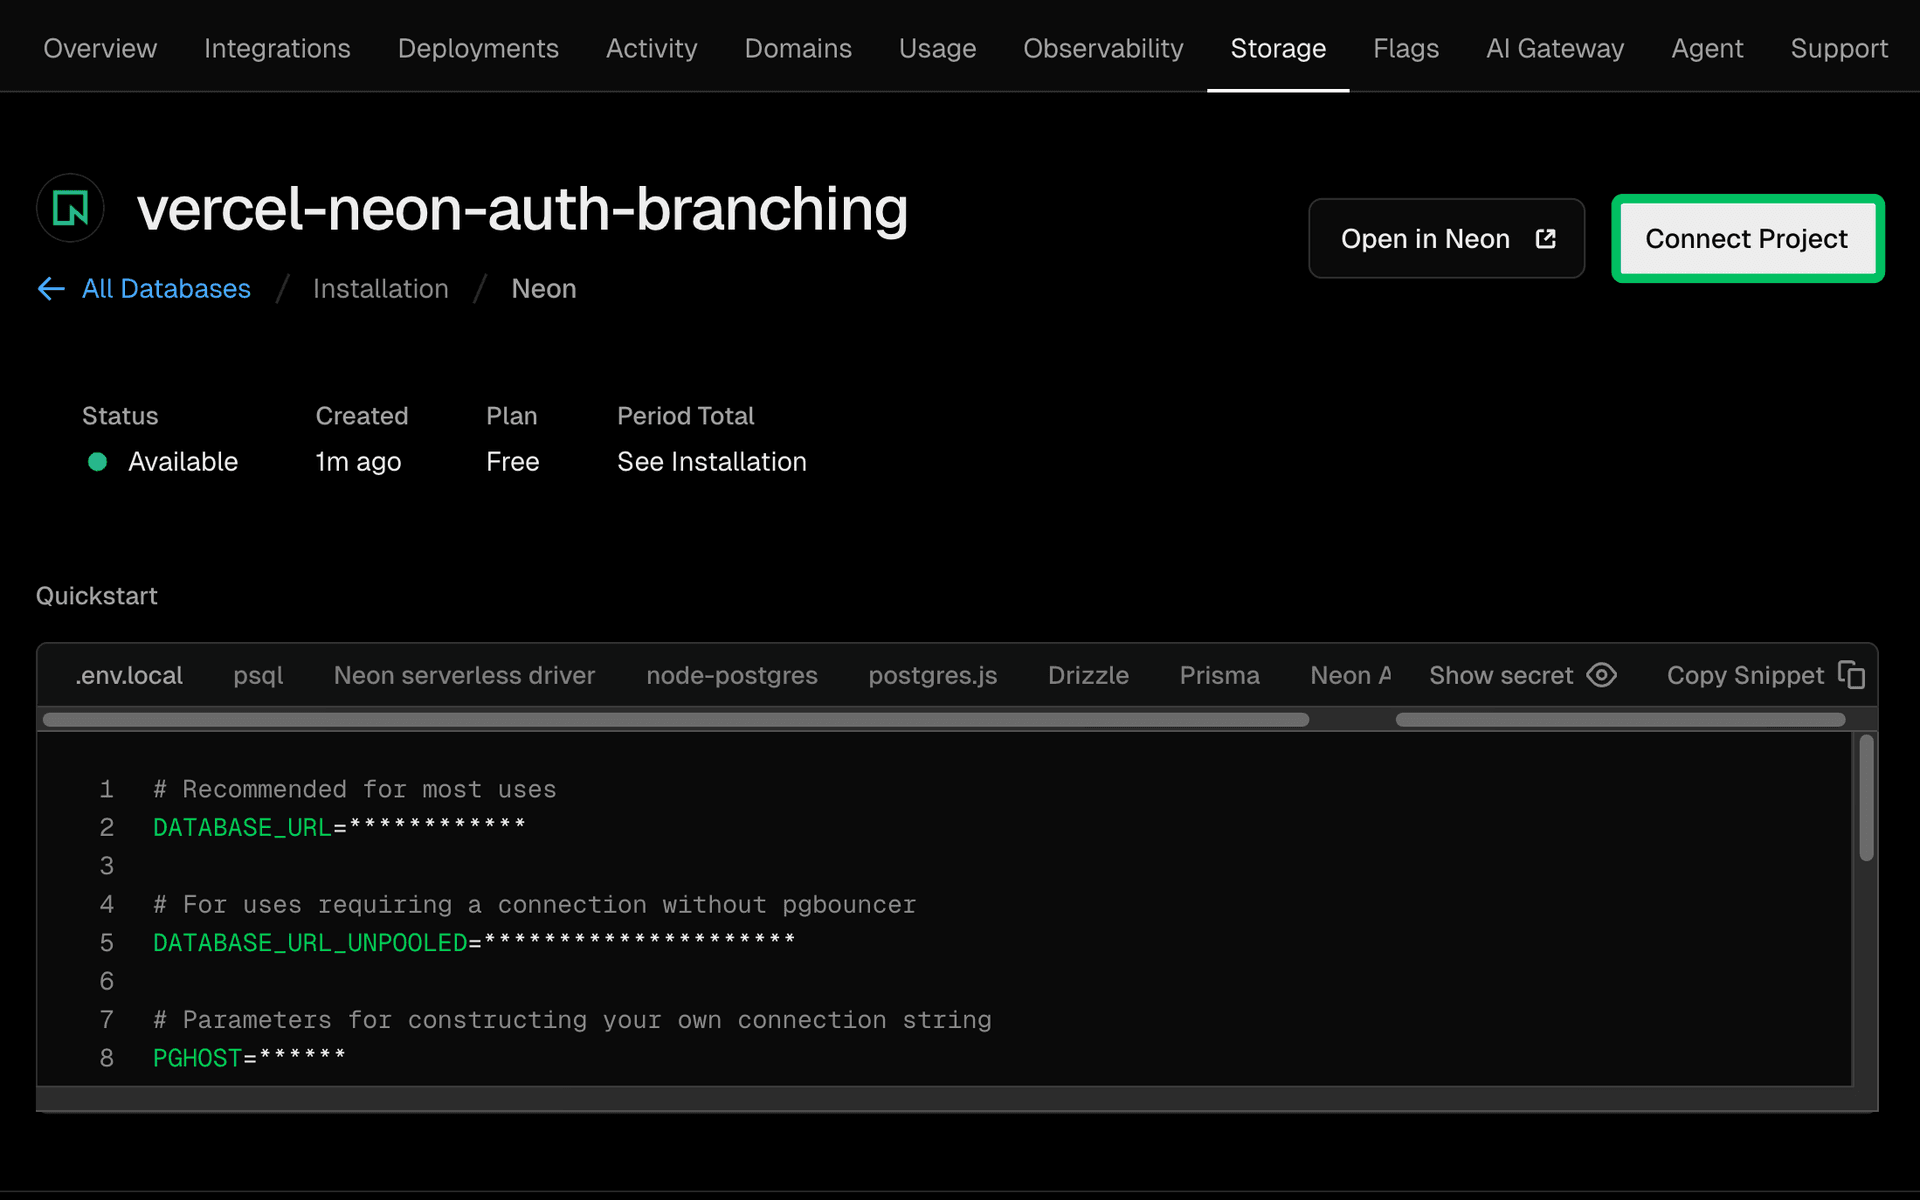
After creation, you should be redirected to a page showing the details of your newly created Neon project. Click Connect Project.
-
In the Connect Project modal:
- Select the Vercel project you just created.
- Enable Create Database Branch for Deployment for Preview deployments.
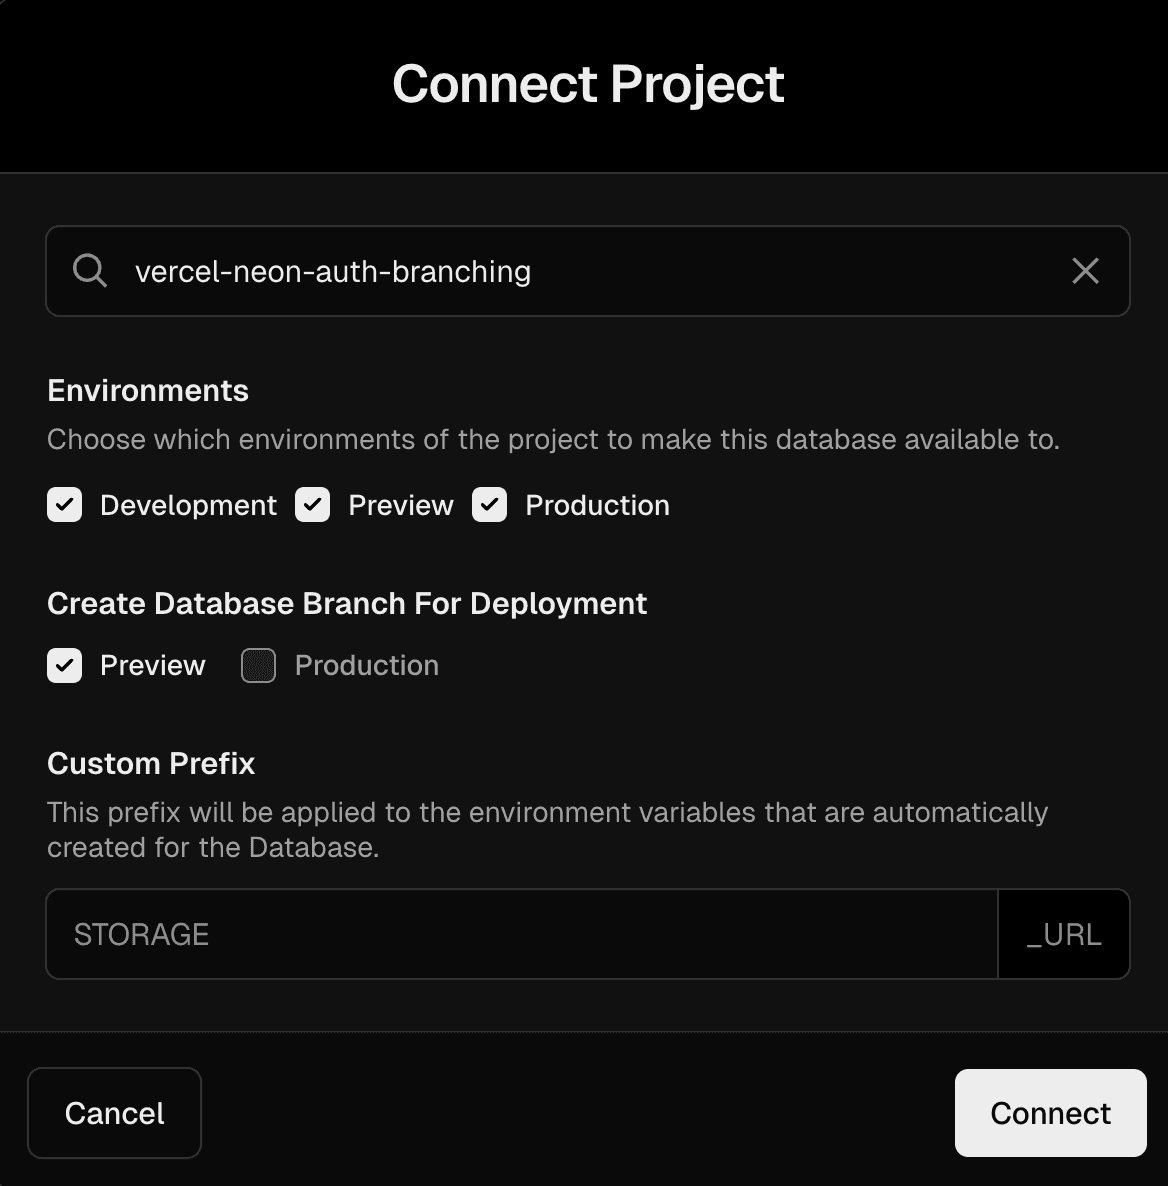
-
Click Connect to finalize the integration.
Vercel will automatically inject the database connection strings and Neon Auth URLs into your selected project’s environment variables for both production and preview deployments.
How automated Auth configuration works
The Vercel integration is aware of Neon Auth. For the
productionbranch, it injects your production Auth URL. For preview deployments, it creates a new database branch, provisions a dedicated Auth API endpoint for that branch, and automatically injects that specific endpoint into the Vercel preview environment.Now that the integration is set up, trigger a new deployment by navigating to the Deployments tab and clicking Redeploy on the latest deployment. You should see a successful deployment this time.
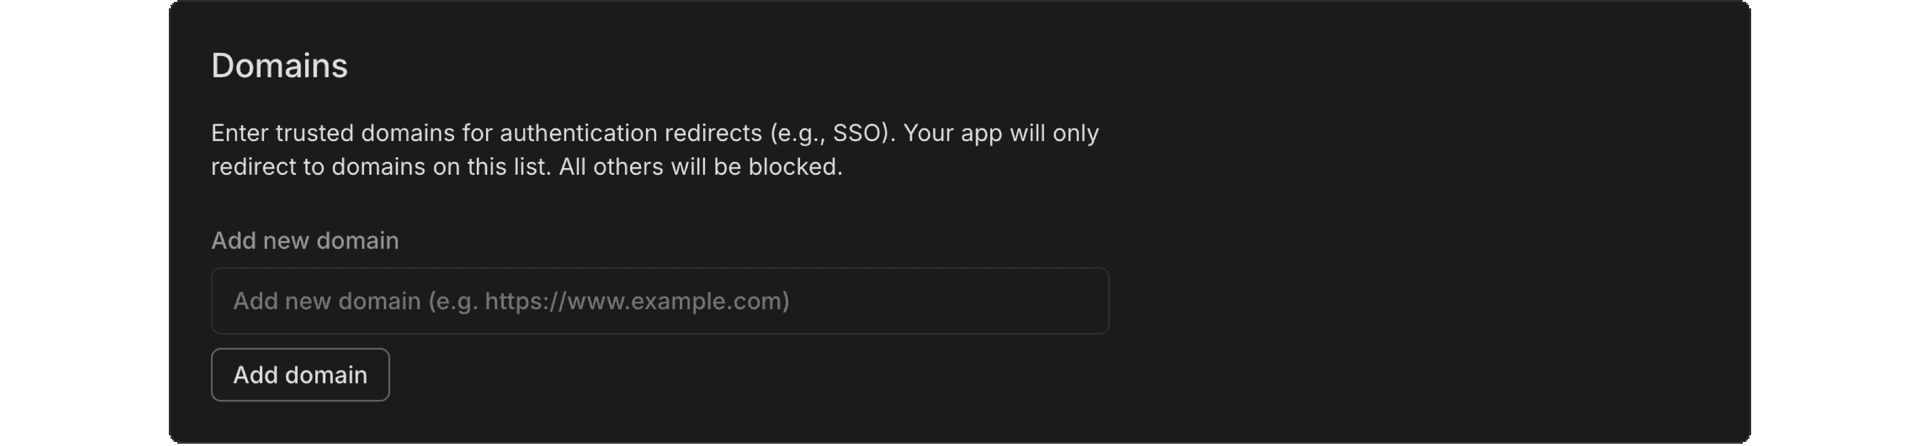
Configure redirect URLs
To enable proper redirection after authentication, you must configure the allowed redirect URLs in the Neon Console for your production environment. For preview deployments, the Vercel–Neon integration automatically manages this configuration using the Vercel preview URLs, so this step is required only for production.
- In your Vercel dashboard, open the Storage tab and select your Neon project.
Click Open in Neon to access the Neon Console. - In the Neon Console, navigate to Auth → Configuration.
- Under Domains, add your Vercel production URL (for example,
https://your-vercel-project.vercel.app) and click Add Domain.
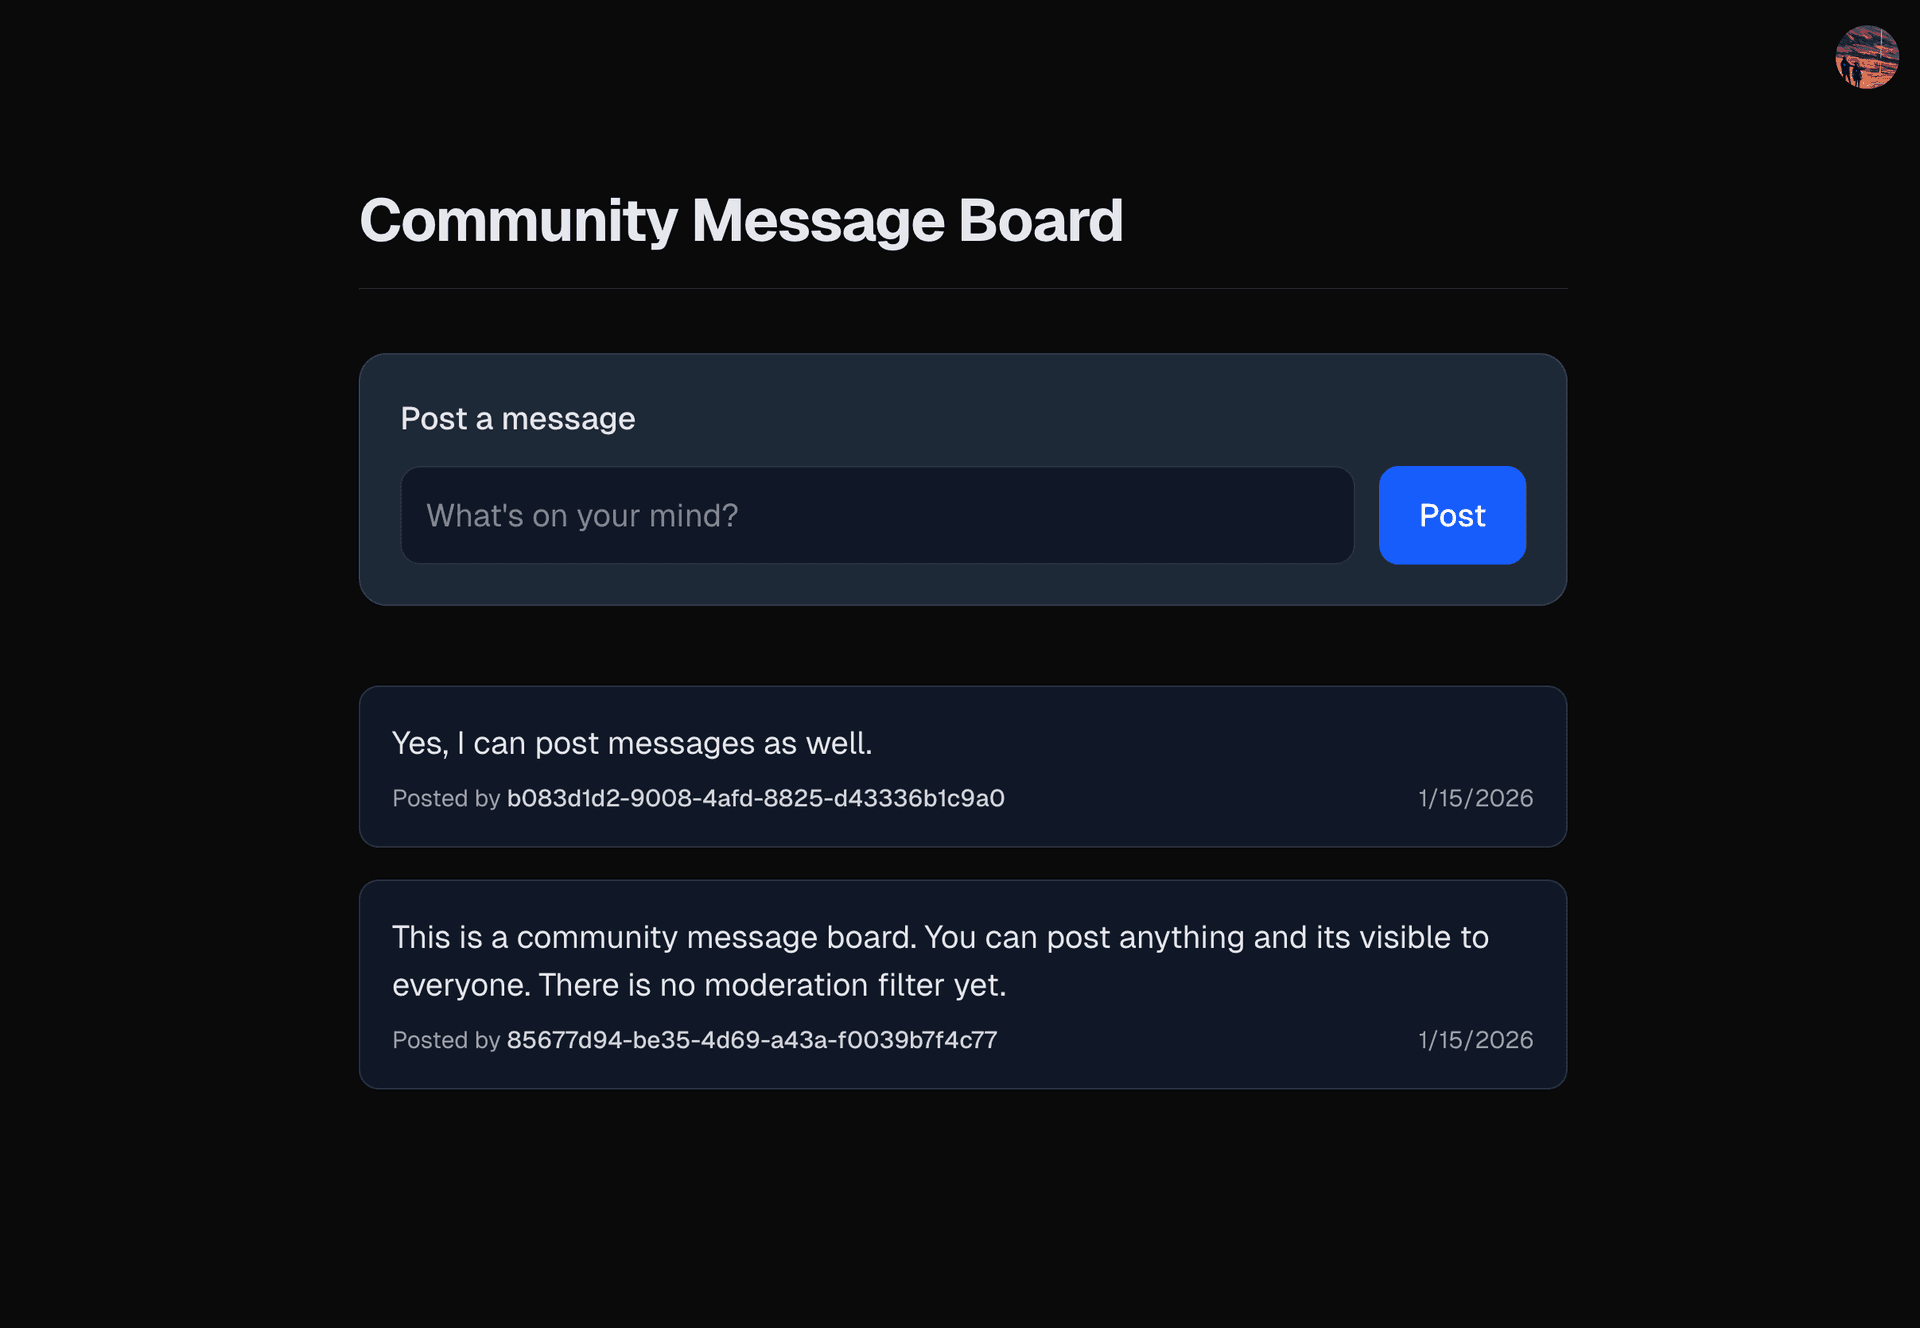
Test the production deployment
Open your Vercel production URL in a browser. You should see the message board application.
Test the core functionality:
- Sign up as a new user.
- Log in with the newly created account.
- Post a message and verify it appears on the board.
- Open another browser or incognito window, sign up as a different user, and verify that you can see messages posted by others.
Once you have verified that the base application is functioning correctly in production, you are ready to develop the moderation feature.
Develop the moderation feature
Now imagine your message board starts receiving spam. To address this, you want to restrict posting so that only Admins can publish directly, while regular users require approval.
This is a sensitive change as any mistake could prevent real users from posting or viewing messages. With the Neon–Vercel branching workflow, you can implement and test this feature safely against real user data, without impacting production.
Clone the repository locally
Clone your forked repository to your local machine.
git clone <YOUR_FORKED_REPO_URL> vercel-neon-auth-branching
cd vercel-neon-auth-branching
Create a feature branch
Start by creating a new git branch for your work.
git checkout -b feat/moderation-queueHow to test locally with real data
You can create a branch of your production database in the Neon Console for local development. This allows you to safely test changes against real data before deploying to Vercel Preview environments, which can then be shared with your team for further testing.
Learn more in Creating Branches in the Neon Console.
You don’t need to do this as part of this guide, but it’s a useful feature for local testing.
Modify the database schema
The current message board schema does not support moderation. To implement this, you will add a new column
is_approvedto themessagestable to track whether a message has been approved by an admin.Add a new column
is_approvedto themessagestable inapp/db/schema.ts:import { pgTable, text, timestamp, uuid, boolean } from "drizzle-orm/pg-core"; // ... other schema definitions ... export const messages = pgTable("messages", { id: uuid("id").defaultRandom().primaryKey(), content: text("content").notNull(), userId: uuid("user_id").references(() => authUsers.id).notNull(), createdAt: timestamp("created_at").defaultNow(), // default to true to allow existing messages to be shown isApproved: boolean("is_approved").default(true).notNull() });Generate the migration file locally by running:
npx drizzle-kit generateThe migration file is generated in the
drizzle/migrationsfolder. During deployment, Vercel automatically applies the migration to the appropriate database (production or preview branch), so you don’t need to run it manually.How are migrations applied during build?
Before building the application, the Vercel build process needs to run the migrations.
You can configure this by updating thebuildscript in yourpackage.jsonto run Drizzle migrations before the Next.js build:"scripts": { "build": "drizzle-kit migrate && next build", // ... other scripts ... }The current setup in the starter repository already includes this step, so no changes are needed.
Implement role-based logic
Update
app/actions.tsto check the user's role. If they are an admin, their messages are auto-approved; otherwise, they require approval.'use server'; import { db } from '@/app/db'; import { revalidatePath } from 'next/cache'; import { createAuthServer } from '@neondatabase/neon-js/auth/next/server'; import { messages } from '@/app/db/schema'; import { eq } from 'drizzle-orm'; const authServer = createAuthServer(); export async function postMessage(formData: FormData) { const { data } = await authServer.getSession(); if (!data || !data.session) throw new Error("Unauthorized"); const isAdmin = data.user.role === 'admin'; await db.insert(messages).values({ content: formData.get('content') as string, userId: data.user.id, // Auto approve if admin else false isApproved: isAdmin }); revalidatePath('/'); } export async function approveMessage(messageId: string) { const { data } = await authServer.getSession(); if (!data || data.user.role !== 'admin') throw new Error("Unauthorized"); await db.update(messages) .set({ isApproved: true }) .where(eq(messages.id, messageId)); revalidatePath('/'); }How does the role-based logic work here?
The
postMessagefunction checks the user's role when they submit a message. If the user is an admin, the message is automatically approved by settingisApprovedtotrue. For regular users, it defaults tofalse, meaning their messages require admin approval.The
approveMessagefunction is restricted to admin users only. It updates theisApprovedstatus of a message totruewhen an admin approves it.Update the UI
Modify
app/page.tsxto conditionally render the Moderation Queue for admins.import { db } from '@/app/db'; import { messages } from '@/app/db/schema'; import { postMessage, approveMessage } from './actions'; import { desc, eq, and } from 'drizzle-orm'; import { authServer } from '@/lib/auth/server'; export default async function Home() { const { data } = await authServer.getSession(); const isAdmin = data?.user.role === 'admin'; const publicMessages = await db .select() .from(messages) .where(eq(messages.isApproved, true)) .orderBy(desc(messages.createdAt)); const pendingMessages = isAdmin ? await db.select().from(messages).where(eq(messages.isApproved, false)) : []; const userPending = data?.session ? await db .select() .from(messages) .where(and(eq(messages.userId, data.user.id), eq(messages.isApproved, false))) : []; return ( <main className="max-w-2xl mx-auto p-8 font-sans text-gray-900 dark:text-gray-200"> <header className="flex justify-between items-center mb-8 border-b border-gray-300 dark:border-gray-700 pb-4"> <h1 className="text-3xl font-bold tracking-tight"> Community Message Board {isAdmin && <span className="text-red-500">(Admin Mode)</span>} </h1> </header> {data?.session && ( <form action={postMessage} className="mb-10 bg-gray-100 dark:bg-gray-800 p-5 rounded-xl border border-gray-300 dark:border-gray-700 shadow-sm" > <label className="block mb-3 font-medium">Post a message</label> <div className="flex gap-3"> <input name="content" required placeholder="What's on your mind?" className="flex-1 p-3 rounded-lg border border-gray-300 dark:border-gray-700 bg-white dark:bg-gray-900 text-gray-900 dark:text-gray-100 focus:ring-2 focus:ring-blue-500 outline-none transition" /> <button className="bg-blue-600 text-white px-5 py-2.5 rounded-lg hover:bg-blue-700 transition font-medium"> Post </button> </div> </form> )} {data?.session && userPending.length > 0 && !isAdmin && ( <div className="mb-8 p-4 rounded-lg border border-yellow-300 bg-yellow-50 dark:bg-yellow-900/30 dark:border-yellow-800 shadow-sm"> <p className="text-sm text-yellow-800 dark:text-yellow-300"> Your message is pending admin review and will appear once approved. </p> </div> )} {isAdmin && pendingMessages.length > 0 && ( <div className="mb-10 bg-yellow-50 dark:bg-yellow-900/30 border border-yellow-300 dark:border-yellow-700 p-5 rounded-xl shadow-sm"> <h2 className="text-lg font-bold text-yellow-800 dark:text-yellow-300 mb-4"> Moderation Queue </h2> <div className="space-y-3"> {pendingMessages.map((msg) => ( <div key={msg.id} className="flex justify-between items-center bg-white dark:bg-gray-900 p-4 rounded-lg border border-gray-300 dark:border-gray-700 shadow-sm" > <div> <p className="text-gray-900 dark:text-gray-100">{msg.content}</p> <span className="text-xs text-gray-500 dark:text-gray-400"> Posted by <span className="font-medium">{msg.userId}</span> </span> </div> <form action={approveMessage.bind(null, msg.id)}> <button className="text-sm bg-green-600 text-white px-3 py-1.5 rounded hover:bg-green-700 transition"> Approve </button> </form> </div> ))} </div> </div> )} <h2 className="text-xl font-bold mb-4">Live Messages</h2> <div className="space-y-4"> {publicMessages.map((msg) => ( <div key={msg.id} className="p-4 rounded-lg border border-gray-300 dark:border-gray-700 bg-white dark:bg-gray-900 shadow-sm hover:shadow transition" > <p className="text-gray-800 dark:text-gray-200 mb-2">{msg.content}</p> <div className="flex justify-between items-center text-xs text-gray-500 dark:text-gray-400"> <span> Posted by{" "} <span className="font-medium text-gray-700 dark:text-gray-300"> {msg.userId} </span> </span> <span>{msg.createdAt?.toLocaleDateString()}</span> </div> </div> ))} </div> </main> ); }How does the UI update work?
The UI checks the user's role using
data?.user.role. If the user is an admin, it fetches and displays messages pending approval in a separate "Moderation Queue" section. Regular users see a notification if their message is pending approval.Test in preview deployment
Now that you have implemented the moderation feature, it's time to test it in a safe environment using Vercel Preview Deployments and Neon Branching.
You need to verify that the moderation flow works correctly with real user accounts, without affecting your production environment.
Push to GitHub
Commit your changes and push the branch.
git add .
git commit -m "feat: implement moderation queue"
git push origin feat/moderation-queue
Navigate to your forked repository on GitHub and open a Pull Request (PR) from the
feat/moderation-queuebranch tomain.Automated provisioning
When you open the Pull Request, the Neon-Vercel integration kicks in:
- Neon creates a database branch (e.g.,
preview/feat-moderation...). This branch contains a snapshot of production, including your real users. - Vercel deploys the preview, injecting the connection string and
NEON_AUTH_BASE_URLspecific to that branch. - Build Step: Vercel runs
drizzle-kit migrateas part of the build step, adding theis_approvedcolumn to the preview database only.
Verify in the Preview Environment
Open the Vercel Preview URL provided in the PR comment (see example).
Verify data integrity
- Log in as an existing user from production.
- Verify: All previous messages from production are visible in the Live feed. The data integrity is intact.
Test the regular user
- Log in as regular user.
- Post a message: "Can anyone see this?"
- Verify: The message should not appear in the "Messages" list. It is successfully caught in the pending state for moderation.
Test the admin flow To test the admin functionality, you need to promote a user to
adminrole in the Neon Console for the preview branch.- Go to the Neon Console.
- Under Branch select the preview branch created for your PR (e.g.,
preview/feat-moderation...). - Navigate to Auth → Users.
- Find a user and change their role to
adminby clicking the three-dot menu and selecting Make Admin. Now you have an admin user in your preview environment.
 - Go back to the Vercel Preview URL and log in as the admin user.
- Verify: You should see the Moderation Queue. Click Approve on the message. It should move to the main feed.

- Log out and log back in as the regular user.
- Verify: The message "Can anyone see this?" now appears to everyone.
Verify Production Isolation
Go to your live Production URL.
- Log in as the admin user you modified in the preview branch.
- Verify: They are still a regular user. The role change you made in the Neon Console only affected the branch.
- Verify: The "Can anyone see this?" message does not exist.
- Production is completely unaffected.
- Neon creates a database branch (e.g.,
Merge and cleanup
When you are satisfied that the code works safely:
- Merge your Pull Request on GitHub. Vercel deploys the new code to Production and applies the migration to the main database.
- Neon automatically deletes the preview database branch once the PR is closed, cleaning up any resources used during testing.
Conclusion
You have successfully implemented a sensitive authorization feature and tested it against real user data without putting your production environment at risk using Vercel Preview Deployments and Neon Database Branching.
By combining Vercel’s preview deployments with Neon’s Auth‑aware branching, you created a realistic sandbox. No need to mock data, seed test accounts, or worry about corrupting production logs. What happens in a preview branch stays in that branch, giving your team the confidence to ship features faster and safer.
Other use cases
Although this guide demonstrated the workflow with a simple message board, the same approach applies to many scenarios in authentication and user management:
- Refactoring RBAC: Safely simulate new permission models against your full user base to catch edge cases before rollout.
- Destructive flows: Test sensitive actions like Delete Account or Cancel Subscription on real data in an isolated branch. If something goes wrong, simply discard the branch, production remains untouched.
- Penetration testing: Provide auditors with a dedicated branch of your production environment to run security tests (e.g., SQL injection, privilege escalation) without risking downtime or data loss.