


Source code
The Data API works with any authentication provider that issues JSON Web Tokens (JWTs). While Neon Auth provides the simplest setup, you can use existing authentication infrastructure with providers like Auth0, Clerk, AWS Cognito, and others.
How it works
When you bring your own authentication provider, the JWT validation flow works as follows:
┌─────────────┐         ┌──────────────────┐         ┌─────────────┐
│   Client    │         │   Your Auth      │         │  Neon Data  │
│ Application │         │    Provider      │         │     API     │
└──────┬──────┘         └────────┬─────────┘         └──────┬──────┘
       │                         │                          │
       │ 1. Authenticate         │                          │
       │────────────────────────>│                          │
       │                         │                          │
       │ 2. Return JWT token     │                          │
       │<────────────────────────│                          │
       │                         │                          │
       │ 3. API request with     │                          │
       │    Authorization header │                          │
       │────────────────────────────────────────────────────>│
       │                         │                          │
       │                         │ 4. Fetch JWKS keys       │
       │                         │<─────────────────────────│
       │                         │                          │
       │                         │ 5. Return public keys    │
       │                         │──────────────────────────>│
       │                         │                          │
       │                         │    6. Validate JWT       │
       │                         │    7. Extract user_id    │
       │                         │    8. Apply RLS policies │
       │                         │                          │
       │ 9. Return filtered data │                          │
       │<────────────────────────────────────────────────────│
       │                         │                          │
The key steps:
- Your auth provider issues JSON Web Tokens (JWTs) to authenticated users.
- Your application passes these JWTs to the Data API in the
Authorizationheader. - Neon validates the tokens using your provider's JWKS (JSON Web Key Set) URL.
- The Data API enforces Row-Level Security policies based on the user identity in the JWT.
Add your authentication provider
You can configure your authentication provider when you first enable the Data API, or add it later from the Configuration tab. Select Other Provider from the dropdown and enter:
- Your provider's JWKS URL (see provider-specific instructions below).
- Your JWT Audience value, if required by your provider (see What is JWT Audience? below).
What is JWT Audience?
The JWT Audience (the aud claim in a JWT) identifies the intended recipient of a token. It's a security measure that ensures tokens issued for one application can't be reused with another.
When you configure a JWT Audience value in the Data API:
- The Data API verifies that incoming JWTs contain a matching
audclaim - Tokens without a matching audience are rejected
- This prevents tokens meant for other services from being accepted by your API
When is it required?
- Firebase/GCP: Required — use your Firebase Project ID
- Google Identity: Required — use your OAuth 2.0 Client ID
- Azure AD, Keycloak: May be required depending on your configuration
- Most other providers: Optional — only configure if your provider includes an
audclaim in tokens
If you're unsure whether your provider requires it, you can decode a sample JWT from your provider at jwt.io and check if it includes an aud claim.
Find your JWKS URL
| Provider | JWKS URL Format |
|---|---|
| Auth0 | https://{YOUR_AUTH0_DOMAIN}/.well-known/jwks.json |
| Clerk | https://{YOUR_CLERK_DOMAIN}/.well-known/jwks.json |
| AWS Cognito | https://cognito-idp.{REGION}.amazonaws.com/{USER_POOL_ID}/.well-known/jwks.json |
| Azure AD | https://login.microsoftonline.com/{TENANT_ID}/discovery/v2.0/keys |
| Descope | https://api.descope.com/{PROJECT_ID}/.well-known/jwks.json |
| Firebase/GCP | https://www.googleapis.com/service_accounts/v1/jwk/securetoken@system.gserviceaccount.com |
| Google Identity | https://www.googleapis.com/oauth2/v3/certs |
| Keycloak | https://{DOMAIN}/auth/realms/{REALM}/protocol/openid-connect/certs |
| PropelAuth | https://{YOUR_PROPEL_AUTH_URL}/.well-known/jwks.json |
| Stack Auth | https://api.stack-auth.com/api/v1/projects/{PROJECT_ID}/.well-known/jwks.json |
| Stytch | https://test.stytch.com/v1/sessions/jwks/{PROJECT_ID} |
| SuperTokens | {CORE_CONNECTION_URI}/.well-known/jwks.json |
| WorkOS | https://api.workos.com/sso/jwks/{CLIENT_ID} |
Auth0
Your Auth0 JWKS URL follows this format:
https://{YOUR_AUTH0_DOMAIN}/.well-known/jwks.jsonTo find your domain:
- Open the Settings for your application in the Auth0 dashboard
- Copy your Domain value
- Use it to form your JWKS URL

For example, if your domain is dev-abc123.us.auth0.com, your JWKS URL would be:
https://dev-abc123.us.auth0.com/.well-known/jwks.jsonClerk
Your Clerk JWKS URL follows this format:
https://{YOUR_CLERK_DOMAIN}/.well-known/jwks.jsonTo find your JWKS URL:
- Go to the Clerk Dashboard
- Navigate to Configure → Developers → API Keys
- Click Show JWT Public Key
- Copy the JWKS URL
For advanced JWT configuration (custom claims, token lifespans), you can use the dedicated Neon template in Clerk under Configure > JWT Templates.
AWS Cognito
Your AWS Cognito JWKS URL follows this format:
https://cognito-idp.{YOUR_AWS_COGNITO_REGION}.amazonaws.com/{YOUR_AWS_COGNITO_USER_POOL_ID}/.well-known/jwks.jsonTo find your JWKS URL:
- Open the AWS Cognito console
- Navigate to User pools
- Select your user pool
- Find the Token signing key URL (this is your JWKS URL)
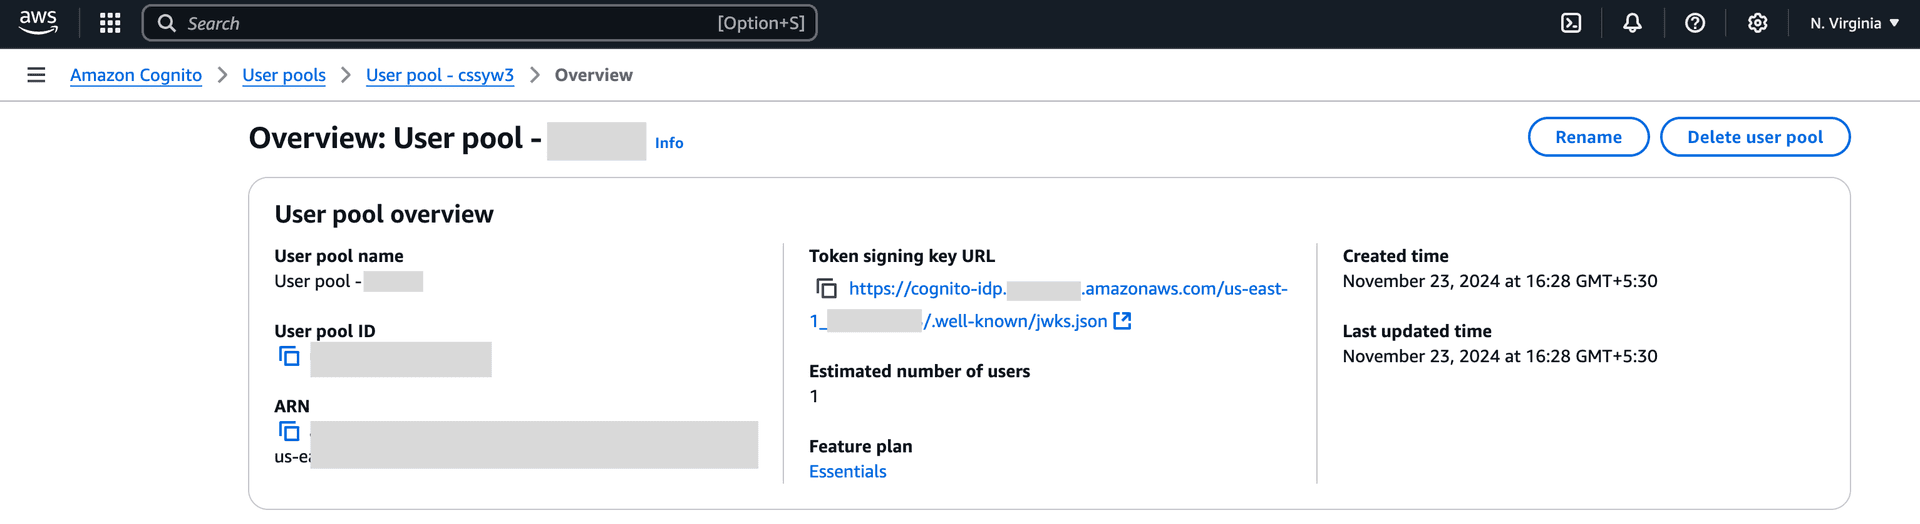
For example, if your region is us-east-1 and your user pool ID is us-east-1_XXXXXXXXX, your JWKS URL would be:
https://cognito-idp.us-east-1.amazonaws.com/us-east-1_XXXXXXXXX/.well-known/jwks.jsonAzure AD
Your Azure Active Directory JWKS URL follows this format:
https://login.microsoftonline.com/{YOUR_TENANT_ID}/discovery/v2.0/keysReplace {YOUR_TENANT_ID} with your Azure Active Directory tenant ID.
For example, if your tenant ID is 12345678-1234-1234-1234-1234567890ab, your JWKS URL would be:
https://login.microsoftonline.com/12345678-1234-1234-1234-1234567890ab/discovery/v2.0/keysnote
Depending on your Azure AD configuration, you may need to provide a JWT Audience value.
Descope
Your Descope JWKS URL follows this format:
https://api.descope.com/{YOUR_DESCOPE_PROJECT_ID}/.well-known/jwks.jsonTo find your Project ID:
- Go to the Descope Dashboard
- Navigate to Project Settings
- Copy your Project ID
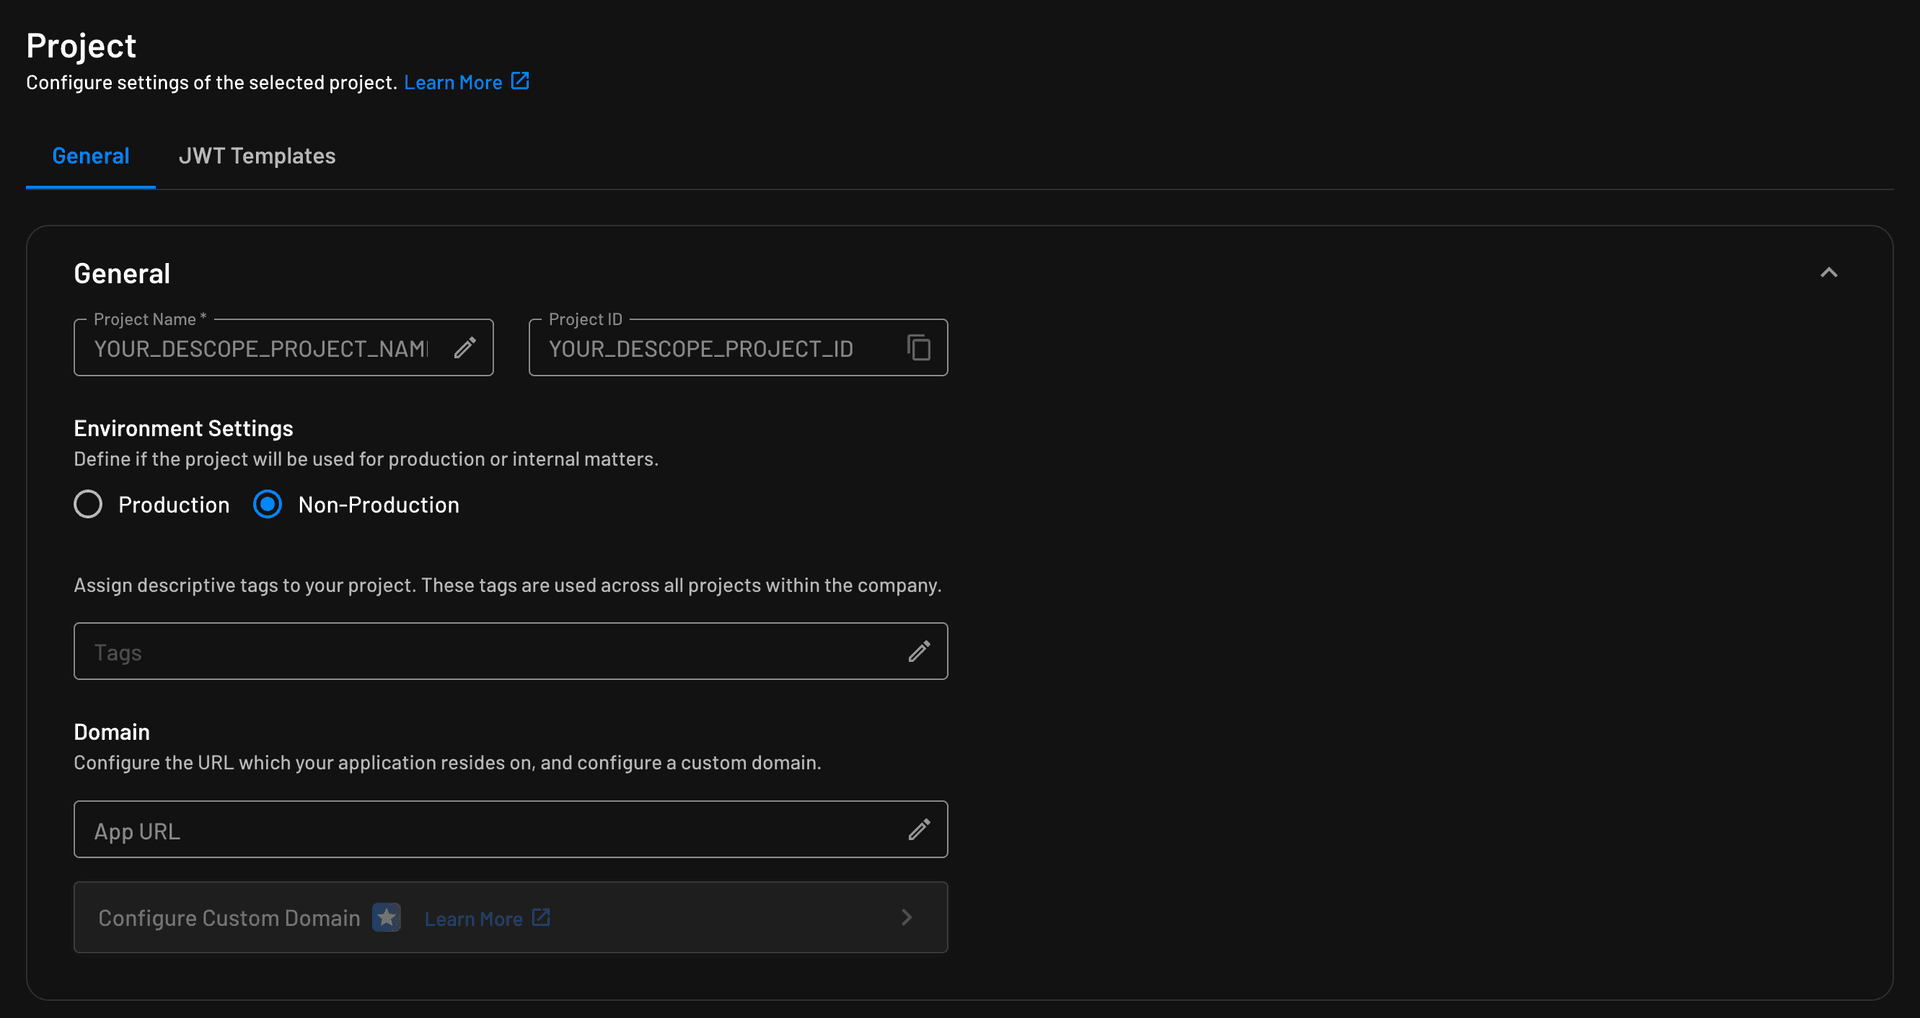
For example, if your Project ID is P1234, your JWKS URL would be:
https://api.descope.com/P1234/.well-known/jwks.jsonFirebase/GCP
Firebase and Google Cloud Identity Platform share the same authentication infrastructure and use a common JWKS URL for all projects:
https://www.googleapis.com/service_accounts/v1/jwk/securetoken@system.gserviceaccount.comYou must also provide your Firebase/GCP Project ID as the JWT Audience value.
To find your Project ID:
- Go to the Firebase Console
- Navigate to Settings > General
- Copy your Project ID
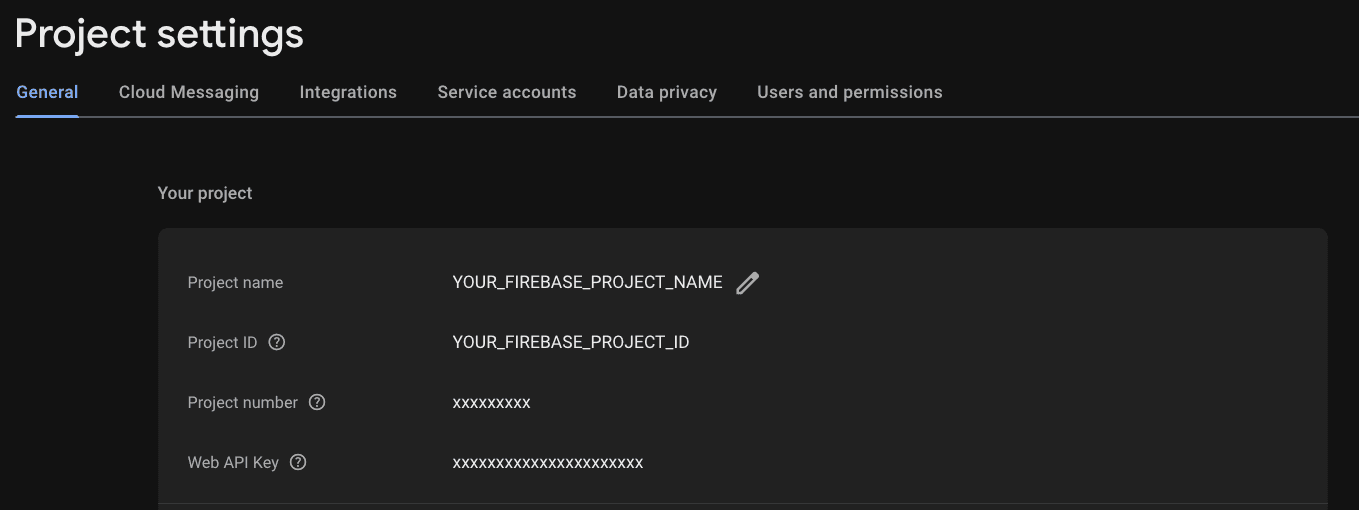
Enter your Project ID in the JWT Audience field when configuring the Data API.
note
Every GCP Identity Platform project automatically creates a corresponding Firebase project, which is why we use the Firebase Console to get the Project ID.
Google Identity
Your Google Identity JWKS URL is:
https://www.googleapis.com/oauth2/v3/certsYou must also provide your OAuth 2.0 Client ID as the JWT Audience value. You can find your Client ID in the Google Cloud Console under APIs & Services > Credentials.
Keycloak
Your Keycloak JWKS URL follows this format:
https://{YOUR_KEYCLOAK_DOMAIN}/auth/realms/{YOUR_REALM}/protocol/openid-connect/certsReplace:
{YOUR_KEYCLOAK_DOMAIN}with your Keycloak domain{YOUR_REALM}with your Keycloak realm name
note
To ensure compatibility with the Data API, configure Keycloak to use only one signing algorithm (RS256 or ES256). You can verify this by opening the JWKS URL and checking the keys manually. Depending on your Keycloak configuration, you may also need to provide a JWT Audience value.
PropelAuth
Your PropelAuth JWKS URL follows this format:
https://{YOUR_PROPEL_AUTH_URL}/.well-known/jwks.jsonTo find your PropelAuth URL:
- Go to your PropelAuth dashboard
- Navigate to Backend Integration in your project settings
- Copy your Auth URL
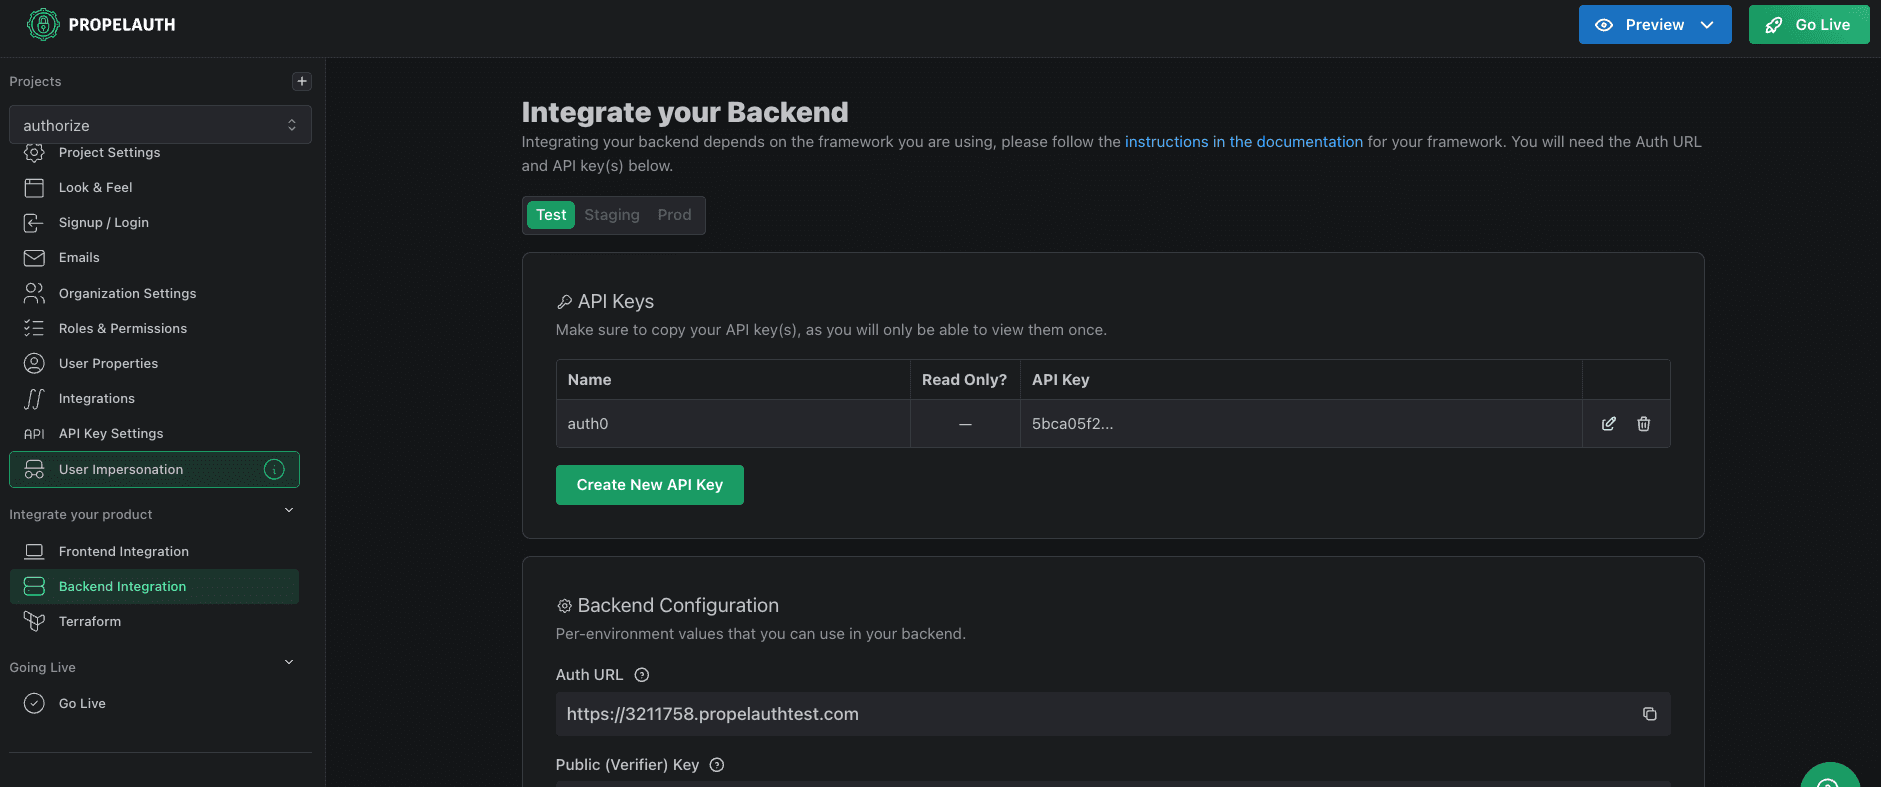
For example, if your PropelAuth URL is https://3211758.propelauthtest.com, your JWKS URL would be:
https://3211758.propelauthtest.com/.well-known/jwks.jsonStack Auth
Your Stack Auth JWKS URL follows this format:
https://api.stack-auth.com/api/v1/projects/{YOUR_PROJECT_ID}/.well-known/jwks.jsonReplace {YOUR_PROJECT_ID} with your Stack Auth project ID.
For example, if your project ID is my-awesome-project, your JWKS URL would be:
https://api.stack-auth.com/api/v1/projects/my-awesome-project/.well-known/jwks.jsonStytch
Your Stytch JWKS URL follows this format:
https://test.stytch.com/v1/sessions/jwks/{YOUR_PROJECT_ID}Replace {YOUR_PROJECT_ID} with your Stytch project ID.
For example, if your project ID is my-awesome-project, your JWKS URL would be:
https://test.stytch.com/v1/sessions/jwks/my-awesome-projectnote
For production environments, replace test.stytch.com with live.stytch.com.
SuperTokens
Your SuperTokens JWKS URL follows this format:
{YOUR_SUPER_TOKENS_CORE_CONNECTION_URI}/.well-known/jwks.jsonTo find your Core connection URI:
- Go to the SuperTokens Dashboard
- Navigate to Core Management
- Copy your Core connection URI
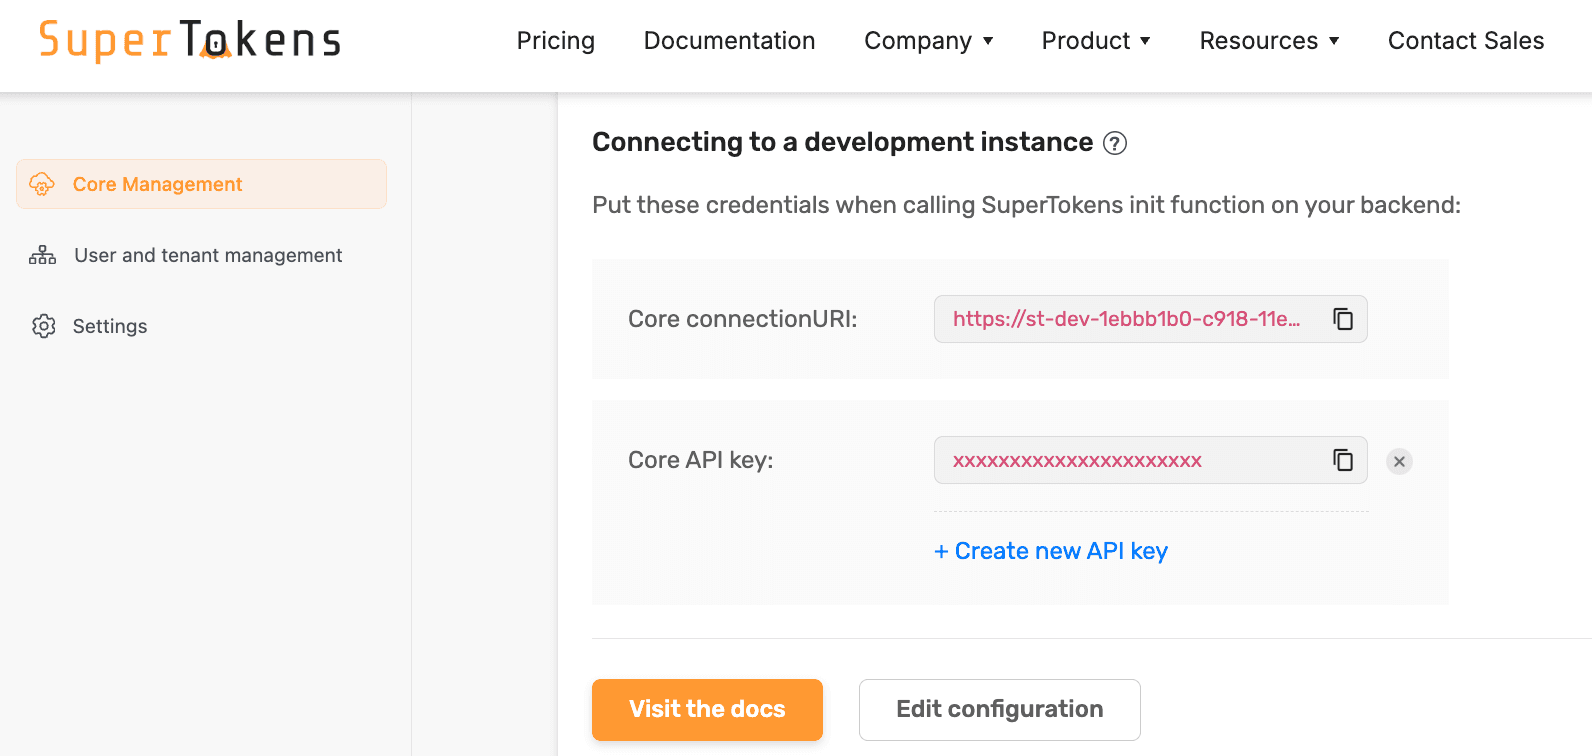
For example, if your connection URI is https://try.supertokens.io, your JWKS URL would be:
https://try.supertokens.io/.well-known/jwks.jsonWorkOS
Your WorkOS JWKS URL follows this format:
https://api.workos.com/sso/jwks/{YOUR_CLIENT_ID}To find your Client ID:
- Go to the WorkOS Dashboard
- Navigate to the Overview page
- Copy your Client ID
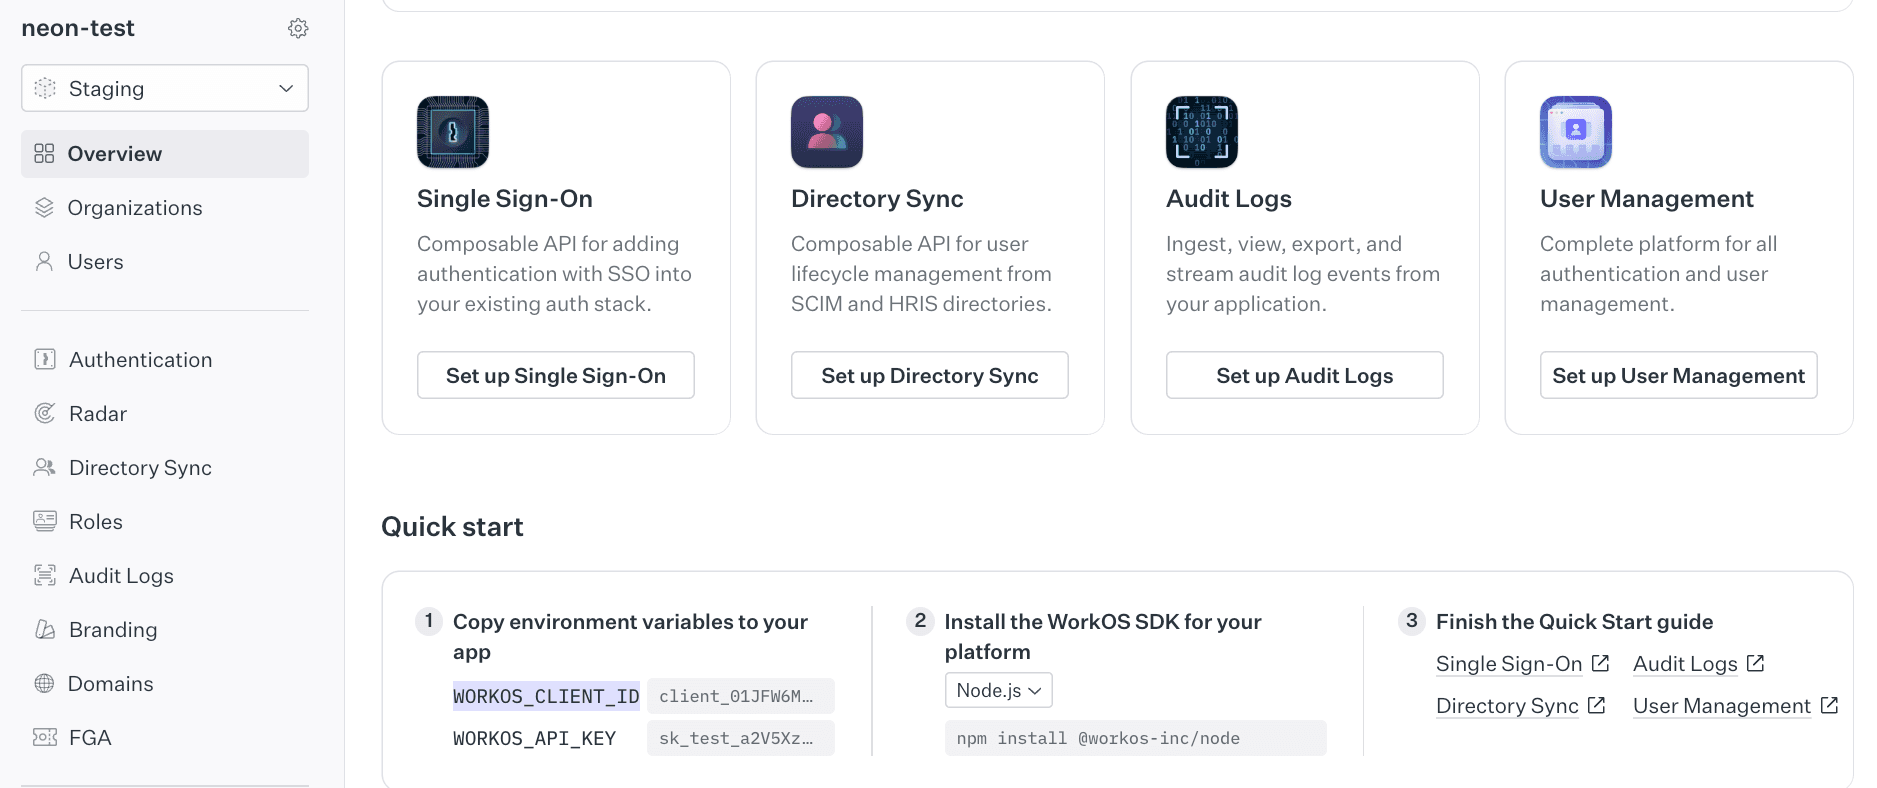
For example, if your Client ID is client_12345, your JWKS URL would be:
https://api.workos.com/sso/jwks/client_12345Next steps
After configuring your authentication provider, include the JWT in your Data API requests:
GET https://your-project.data.neon.tech/v1/posts
Authorization: Bearer {your_jwt_token}
Then set up Row-Level Security policies to control data access using the auth.user_id() function, which extracts the user ID from your JWT.